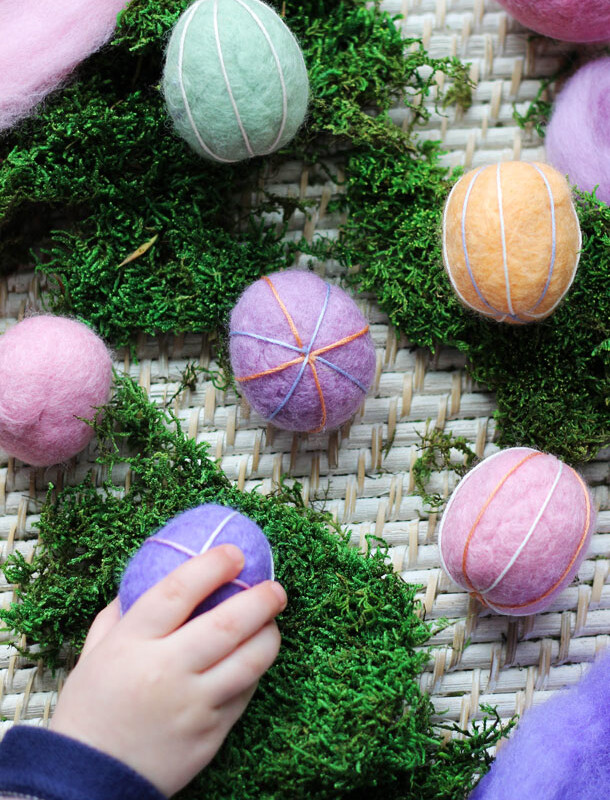

Easter egg crafts hold a special place in my heart, right up there with Valentine’s Day card making. They’re low-pressure, great for kids, and best of all, they just scream spring! I’ve always loved the rustic and homemade look of felt balls, so for this project we used wool roving to make egg-shaped delights rather than the standard balls or beads. The final product is soft, sweet and will last for many Easters to come. Keep reading for the instructions, and let me know any questions you might have in the comments section!

![]()
- wool roving (this etsy shop has a great selection)
- 1 bowl warm, soapy water
- 1 bowl lukewarm water
- scissors
- cotton embroidery thread
- 3″ long needle

![]()
- Tear a small strip of wool roving and roll into a loose ball in your hand.
- Dip ball in bowl of warm soapy water, submerging completely.
- Very gently, begin rolling ball in your palms. The gentler your pressure, the better. When the ball cools, dip again into warm water and continue rolling. Repeat this pattern, increasing pressure between dips, until ball is tight and small.
- Rinse ball in lukewarm non-soapy water and set aside to dry. These small balls will act as the “core” of the eggs.
- Tear wool roving into long, thin strips. Lay strips flat and gently separate wool of each.
- Wrap strips around dried “core” until ball is about twice the size you want the final egg to be.
- Dip ball into warm, soapy water. Again, gently roll ball in your palms. As the ball cools, dip again into warm water and continue rolling. Repeat this pattern, increasing pressure between dips, until ball is tight.
- Once ball is tight, roll in palms to create an oblong egg shape.
- Rinse egg in lukewarm non-soapy water.
- Adjust shape as needed and set aside to dry.
- String thread through needle eye, and thread through center of egg as pictured.
- Pull needle and thread far out of the top of the egg, wrap around, then thread back through original point of entry on bottom. Continue doing this until you’ve threaded four lines.
- Cut thread at top and bottom of egg.
- Repeat threading in secondary color, and cut thread when done.