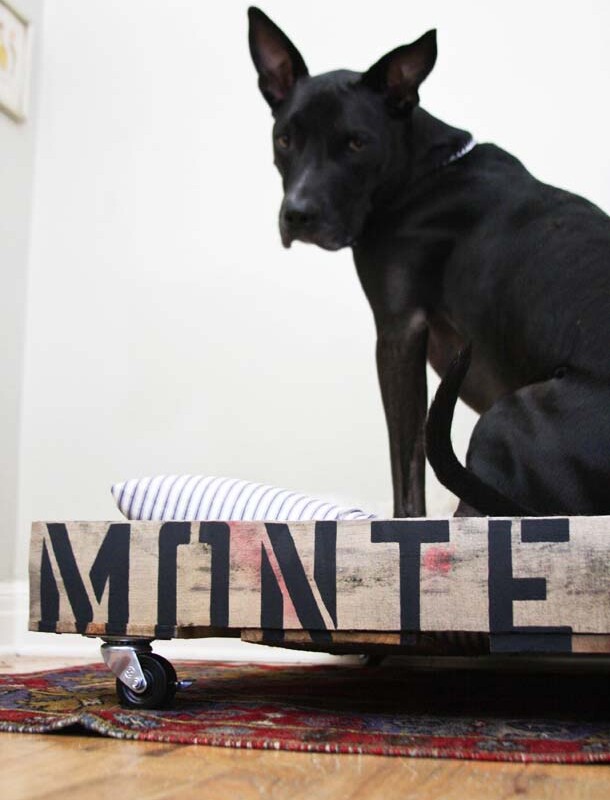

Claire here, and two weeks ago I asked for your opinions on which dog bed I should make for Monte. Although I was definitely drawn to the bright fun pattern of option 1, I had to remind myself that Monte is rather large and energetic, so I needed to make a bed that could stand up to his active (and often dirty) lifestyle. I’ve been itching to transform a pallet for a while now, and thought this would be the perfect time to give it a whirl. I love the final product (and I think Monte agrees), and am so pleased with how perfectly it fits into my living room. And best of all, when company comes over I can roll it out, set a large tray on top and use it for a low coffee table… easy, fun, and versatile. Want to make your own? Follow the instructions below!


![]()
- pallet
- fabric (I used ticking fabric similar to what pillows used to be made out of, because it is durable and I love the pattern)
- zipper (long enough to match the width of the pallet)
- pillow fills
- 4 locking wheels
- letter stencils (I used 4″ ones from Home Depot)
- saw
- hammer
- sander
- drill
- sewing machine
- pins
- scissors
- measuring tape
- pencil
- blue painters tape
- acrylic paint
- paintbrush
- Disassemble your pallet. I removed the slats on one side of it with a hammer and then pried the middle support board off, leaving two opposing sides still attached, creating a u-shape.
- Saw perpendicular to the “walls” to trim the pallet to the desired size (for Monte, I made mine 30×36″).
- Sand and smooth rough edges.
- Drill wheels into each corner.
- Tape letter stencils to one side of the bed to personalize. Trace the letters and hand-paint them with black acrylic paint. You can also choose to spray paint them.
- Measure the space your cushion will need to fit into. Set pallet aside.
- Cut two pieces of fabric to fit the inner measurements of your pallet.
- Lay the two fabric pieces with the outer sides facing each other. Pin together.
- Sew three of the edges together. The zipper will be sewn on the fourth (let a shorter side be the not sewn edge to avoid using an extra long zipper).
- With the pillow case still inside out, fold the edges of the open side down 1/4-1/2″ and pin the zipper along the fold.
- Sew the zipper into the opening (most zippers have instructions on how to sew into place in case my instructions aren’t clear enough!)
- Turn the pillow case right side out, and stuff with pillow forms (or batting if you prefer).
- Place in frame, and voila! You have a dog bed that is moveable and washable!

*photos by Claire Zinnecker for CamilleStyles.com