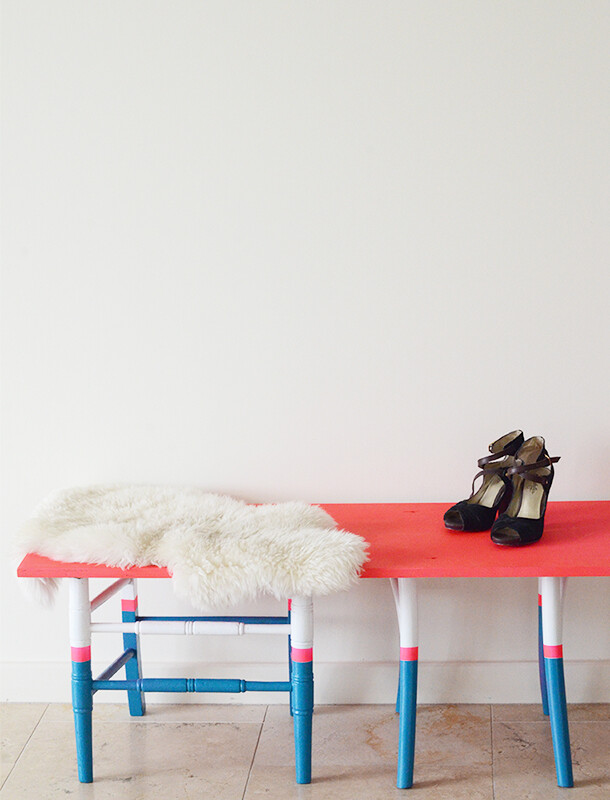

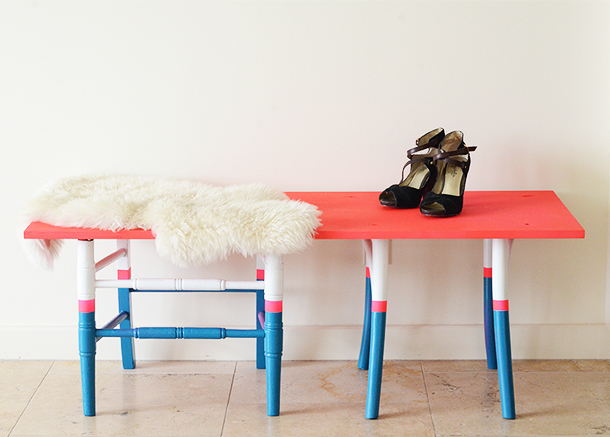
Claire here, and if the warm weather is inspiring you to get outdoors and be creative, this cheery DIY project is for you. It’s a bit more involved than my gold brick bookends from last month, but the end result is one that’ll totally transform an entryway or cozy nook in your house. Two weeks ago I asked for your opinion on which bench I should make… I felt inspired by all of them, but from a do-it-yourself standpoint, the vintage stool bench won me over. With a little trial and error (and a lot of spray paint) I designed a bench that I absolutely love, and hopefully it’ll inspire you to create a similar one for yourself! Keep reading for the instructions, and be sure to leave your comments and questions below…

![]()
- 2 chairs
- circular saw (some Home Depots let you rent these)
- hand sander
- cordless drill
- 1/8″ drill bit
- Hex shank spade bit 7/16″
- 2-3 cans Kilz areosol primer
- spray paint (I used 2 cans each of Rustoleum Blue Lagoon, White Gloss, Neon Pink. I recommend Krylon, though — my Home Depot just stopped carrying it)
- Polycrylic
- blue painters tape
- 48″ x 24″ x 3/4″ pre sanded plywood
- spackle
- 8 wood screws #8×2″ flat head phillips
- pencil
- tape measure
- level
- protective glasses
![]()
- Measure and mark all chair legs to the exact same height. A level helps with this.
- Wearing protective glasses, use the circular saw to cut all legs where marked, separating legs from chair seat/chair back.
- With the hand sander and medium sandpaper, smooth cuts on legs and sand finish/stain off chairs.
- Prime sanded legs with the Kilz areosol primer, set legs aside to dry.
- Cut down the sheet of sanded plywood to a couple inches wider than the depth of your chairs. Home Depot can do this for you. I cut mine to 48″ x 18″ x 3/4″.
- Lay plywood board down flat. Place and mark legs in final position. This is where you will drill holes from the plywood to the legs.
- Using the 1/8″ drill bit, drill through the plywood where you made each mark. Then drill through the top center of each leg.
- Switch to the 7/16″ Hex Shank Spade bit. Carefully drill a hole 1/4″ deep into screw holes on the plywood, creating an inset that allows the screw head to lay flush (this is called countersinking).
- Sand the plywood top with the hand sander and medium sandpaper until smooth. Prime sanded plywood top with the Kilz and set aside to dry.
- Use the painter’s tape and spray paint to create the striped pattern of your choice.
- Once all pieces are dry, position the top onto the legs. Line up the holes, and drill in each screw.
- Spackle all the countersunk holes and screws and allow to dry.
- Spray puttied holes with primer, then carefully spray over primed patches.
- Finally, seal and protect your furniture with the polycrylic.