I have always been a huge proponent of establishing an at-home skincare routine and sticking with it. When it comes to good skin, consistency is key. I’ve been on a cleanse, tone, moisturize, and sunscreen routine since I was 14 (I’m now heading into my 40s), and while the brands have changed over the years, the routine has not. I’m often asked about my skincare regime and the products I use, which I’m more than happy to share, but one thing I know for sure: everybody’s skin is unique and individual which means their routine (and at-home facial) should be too.
Of course, there are some products that are universal and tend to work well on all skin types and concerns, but as much as I preach about ditching St. Ives Apricot Scrub, hundreds of women (including Camille and Gigi Hadid) will tell me they love it and how well it works for their skin. So, who can argue with that? I guess what I’m trying to say is, find the products that work for your skin and seek professional advice if you can.
Most of the knowledge I have acquired over the years is from licensed estheticians and dermatologists who provide tailored treatments and products to improve my skin health. Because, as my beloved friend and LA-based esthetician, Matthew Miller reminds me, that’s what we should all be aspiring to—healthy skin! And he adds, “remember that skin has texture, scars, breakouts. Do not compare your skin to Instagram pictures. Besides filters, lighting makes a huge difference! The key to good skin is consistency and patience.” Hear, hear!
I asked Miller to share his step-by-step process for a spa-worthy at-home facial including the products he recommends (of course, no shopping is required and you can use what you already own!)
And keep scrolling to read his top five most commonly asked questions around at-home facials including his advice for at-home extractions, even though he doesn’t recommend doing it!
Step 1: Double Cleanse
First, start with a balm or oil cleanser. Apply on dry skin, massage well over the face, neck, décolletage area too. When done, add water, massage again, and then remove.
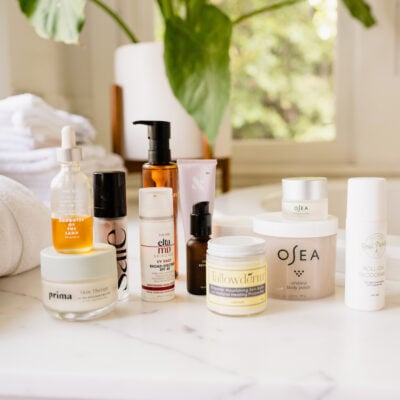
Follow this step with a gentle, yet effective, cleanser like the iS Clinical Cleansing Complex. Really spend time massaging the skin during the cleansing process, especially during the second cleanse as this is where you get deeper into the skin to remove any makeup, dirt, and impurities. Remove with a warm washcloth.
Step 2: Exfoliate
I prefer chemical or enzyme-based exfoliants over physical as it’s gentler on the skin. Massage the exfoliating product into the skin gently being careful not to scrub or be too astringent during the application process—let the chemical exfoliant do all the work for you!
Below are my favorite options:
Osmosis MD: Suitable for all skin types, especially for dull and/or dry skin.
iS Clinical Tri-Active Exfoliating Masque: Great for Acneic or oily skin.
Osea Black Algae Mask: Recommended for combination to Acneic skin.
Step 3: Treatment Mask
Apply a mask that helps to treat the skin concern you’re looking to solve. For example, reach for a hydrating mask if your skin is dry and needs a drink, or apply a clay detox mask if you’re looking to clear breakouts. This one from iS Clinical is hydrating and cooling so it’s great for acne as well. Pro Tip: I use this mask while I use my NuFace, so if you have one, definitely use it during this step.
Step 4: Toning Mist
Now that you have cleansed, exfoliated, and masked, it’s time to tone. The jury is out for some on whether toner is a necessary step in a skincare routine, but I am definitely in the pro toning camp. At this point in your at-home facial, your skin is prepped and primed for the soothing and antioxidant-rich ingredients of a toner. I prefer a toning mist, either this one from Osea that soothes and reduces redness or one that has brightening benefits.
Pro Tip: Store your toner in the fridge for a nice cooling effect. Both can be used to set makeup as well. And if you have an at-home LED device, this would be the time to use it.
Step 5: Serum
Which serum you choose is totally up to you and your skin concerns, but your skin at this stage of the at-home facial is ready to really absorb all of the ingredients you apply. I love the iS Clinical poly-vitamin serum because it’s great for all skin types with soothing, hydrating, and brightening properties. Or my personal favorite, the iS Clinical Youth Serum that is often referred to as Botox in a jar.
Step 6: Moisturizer
This is the (almost) final step in your facial and I highly recommend using this moment to give yourself a facial massage. Your skin should feel incredible right now so take a few minutes to really stimulate blood circulation and increases the proportion of elastin and collagen in your skin through massage, not to mention relieve muscle tension and iron out any kinks along your brow and jawline. I love iS Clinical reparative moisture emulsion because it is great for all skin types with a dewy yet lightweight finish. Or if you have dry skin, opt for a richer moisturizer like the Osea advanced protection cream. But of course, if you already have a product you love that works well for your skin, use that one!
Step 7: Face Oil
Facial oils are more sealants than moisturizers. So, at night I will add a little to my hands, rub them together to warm the product, and just pat over my face. Here are some I recommend:
Osmosis MD Nourish Avocado Facial Oil: Best for inflamed or Aneic skin
Osea Undaria Argan Oil: Suitable for dry or sensitive skin.
Osea Essential Hydrating Oil: Great for normal to combo skin.
5 Common At-Home Facial Questions, Answered:
1. The steam part of a facial is often the highlight. Do you recommend this at home? How can you achieve that without buying a steamer?
The main reason we use steam in the treatment room is to soften the build-up within the pores. This helps before extractions so we don’t add trauma to the skin. I usually don’t recommend steam for at-home facials, for a few reasons.
—People overuse them and this can lead to irritated and dehydrated skin.
—Some people don’t know what’s going on with their skin and steam can make it worse. If someone has irritated or stripped skin then adds a clay mask and steam, that’s not going to end so well.
—Since I don’t recommend extractions at home, steam isn’t necessary.
While there are benefits, I think you can cause more damage to the skin with at-home steaming. I think you can get the same results by applying a warm washcloth to your face.
2. What about extractions—is there a safe way to do this yourself?
I don’t recommend at-home extractions, however, I know people are going to touch and play so, if that’s you, follow these steps:
—Cleanse your skin. I recommend taking a warm (not hot) shower beforehand so the skin and build up in the pores are softer.
—Only extract blemishes that are at a head.
—Wrap a tissue around your index fingers so you don’t damage the skin with your nails.
—Get as close as you can to the blemish and give two gentle squeezes. If nothing comes out, leave it alone, it’s not ready!
—If something does come out, cleanse the area so bacteria doesn’t spread to other areas of the face.
—If it is a bigger blemish, the spot may scab. Hold off on any exfoliating products on the spot and let it heal. Exfoliating the area that needs to heal can lead to a dark spot or scar.
3. What are the common mistakes people make when giving themselves an at-home facial?
Trying to do too many extractions or doing extractions that aren’t ready. BHA/Salicylic Acid is the best for blackheads or pimples so be patient and use a product with that ingredient. Quick fixes are often harmful or irritating to the skin. Most are just band-aids for the issue as well. The iS Clinical Tri Active Exfoliating Mask I mentioned earlier is my favorite product for blackheads.
4. There are so many in-clinic devices available for at-home use now—micro-needling, high-frequency tools, LED masks, and microcurrent—do you recommend any of these at home? Which ones work and are worth the investment?
These are my favorite!
AnteAGE Home Microneedling System
NuFace Trinity Facial Toning Device
ZIIP Beauty Microcurrent Device
Professional Grade Portable High-Frequency D’arsonval Facial Device
5. What about at-home peels—thoughts/concerns? What are the best peel products for beginners?
I do not recommend at-home peels… well, true peels. Leave it to the pros. However, I do think some at-home chemical and/or enzyme exfoliants are amazing. This is a personal favorite.
How do you give yourself an at-home facial? Share your process and products below.