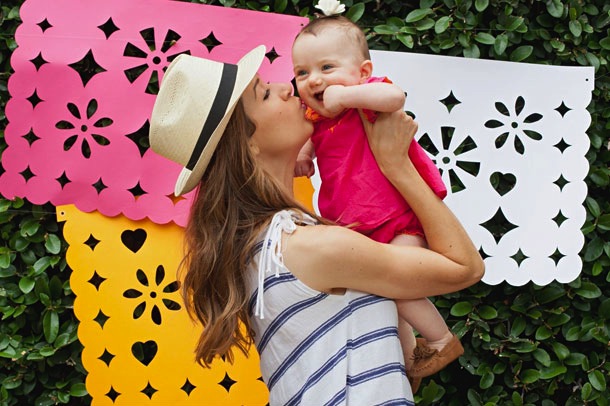
I think we can all agree that these days, no party is complete without a photo booth backdrop… no exceptions! So if you caught our (slightly premature) Cinco de Mayo celebration last week, you may have spotted the giant papel picado backdrop we all hammed it up in front of. Believe it or not, this idea was inspired by — wait for it — a Taco Cabana patio about 9 months ago. Since then, I’ve been dying to put my jumbo paper flag concept to the test, and with the help of Jenn and some extra-fun party guests, they turned out just as I’d imagined! Keep reading for the tutorial, and get to crafting in time for this weekend’s Mexican-inspired festivities…


![]()
- printable papel picado border stencils
- printable papel picado interior stencils
- downloadable papel picado examples, for reference
- 19.5″x25.5″ brightly colored poster boards — we purchased these at Joann’s.
- pencil
- craft knife
- cutting mat
- hole punch
- clear reinforcements

![]()
- Use craft knife to cut out scalloped edge stencils, as pictured.
- Line up dotted lines “A” and tape together.
- Line up dotted lines “B” and tape together.
- Lay border stencil along bottom of poster as pictured, and trace with pencil.
- Flip stencil over horizontally and position in opposite bottom corner, lining the pattern up with traced marks made in step 4. Trace.
- Flip stencil over again as pictured, and trace.
- Flip stencil over again as pictured, and trace. Now the right, left, and bottom borders should be traced.
- Cut out border as pictured. tip: Since all the flags will have the same border, you can now use this partially complete flag as a stencil for the border of the rest of the flags. This is a larger, easier alternative to steps 4-7.
- Use craft knife to cut out interior stencils.
- Using interior stencils, trace the interior flag design of your choice. Download this document for an example of a few possible arrangements.
- Cut out traced design.
- On the top-right and top-left corners of the flag punch a single hole.
- Adhere clear reinforcements to the front and back of punched holes to ensure paper wont rip once the flag is hung.
- Repeat to create additional flags, and hang using twine or clear fishing wire.