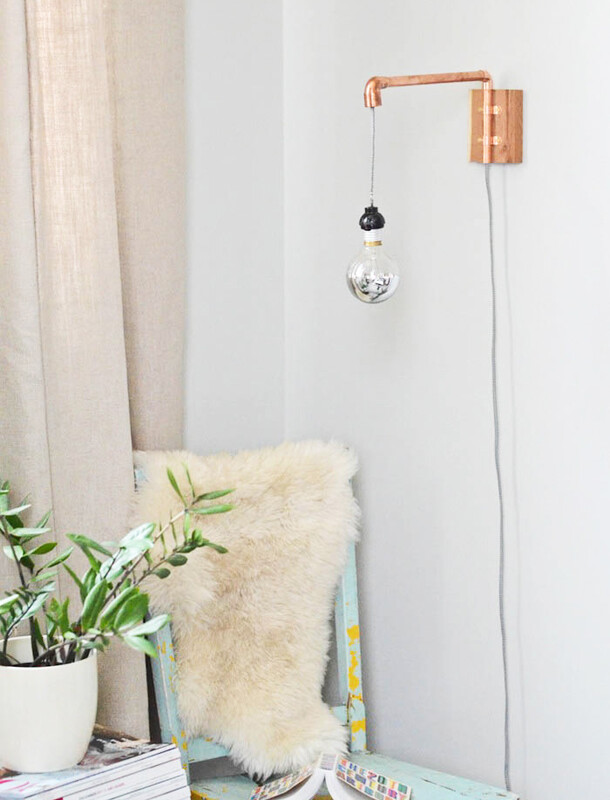
Hi, my name is Claire, and I’m a lighting addict. If there’s one home accessory I can’t get enough of, it’s a good light fixture… but of course, this addiction often comes at the expense of my poor wallet. Today’s fun and seriously easy project will add interest to any room that’s needing some extra light. The swiveling sconce design is simple and fully customizable, and all the materials you’ll need to recreate it can be found in one quick trip to the hardware store. Keep reading below to see how I did it!
*note: pictured above are the supplies to make two sconces because I made a one to go on either side of my bed, but below I’ve listed out the supplies required to make just one.
- 2′ long x 1/2″ dia. copper pipe
- 1/2″ copper elbow — qty 1
- 3/4″ x 1/2″ copper reducing elbow — qty 1
- wood screws #6x 5/8″ — qty 2
- 1/2″ copper tube strap — qty 2
- 1 Hole D-Ring Hanger — qty 1
- 10 lbs Professional Picture Hanger — qty 1
- cloth cord set (I got mine at Urban Outfitters, but Sundial Wire is another good source)
- chrome globe light bulb (also available at Home Depot)
- approx. 4″ x 12″ piece of wood
- jigsaw (many Home Depots let you rent these or cut in store)
- metal cutting blade for jigsaw
- hand sander
- cordless drill
- Using the jigsaw with a metal blade, cut your copper pipe to one 1 ft. piece and one 5 in. piece.
- Cut wood to be 4.5 in. long. This will become your sconce back plate.
- Attach the d-ring hanger to the back of the wood piece.
- Center your 5 in. pipe onto the wood back plate, put the copper straps (2) on the pipe as pictured. Drill holes, screw in screws, securing the 5 in. pipe to the wood back plate.
- Take apart cloth cord set.
- Remove wire from socket.
- Weave the cord through the 5 in. pipe.
- Add the then the 1/2 in. copper elbow and the 1 ft. pipe as pictured, and continue to feed the cord through.
- Lastly, attach the 1/2″ x 3/4″ elbow and pull cord through.
- Rewire the socket and screw in light bulb. I chose to leave off most of the plastic casing that we removed from the bulb in step 5 for aesthetic reasons. (note: it has been brought to my attention that if the plastic casing is left off, electrician’s tape should be wrapped around the threaded silver part for shock prevention. Safety first!)
- Nail the Perfect Picture Hanger hook into the wall, hang sconce and enjoy!
Share this Post
Leave a Comment
Comments (77)
Author
Whoah! Claire, this is awesome. You’ve really outdone yourself this time! I want two of those for either side of my bed!
Thanks lady! I’d love to make you some!!
It looks great, Claire! Very impressive.
xo,
Ashley
Thank you, Ashley! It was a really fun project.
I’ll say it again- please open an etsy store. You’d have plenty of business from me. This is amazing.
So exciting to hear!!! It’s definitely been a frequent thought of mine…!
AMAZING DIY! Thanks for sharing, as soon as I own a home, I am going to create and install a couple of these. I love copper
I am a huge copper lover myself, and this is one of my first DIY’s with it….definitely won’t be my last!
Wow these are amazing. They are little works of art. Very clever.
Thank you!
Very nice job, Claire! It looks great.
Thank you! They were really fun to design.
love how clean and simple these are! great job on the shots too 🙂
Thanks Kate! Chanel helped with the styling and shooting and well she’s pretty fabulous! 🙂
This is really amazing! Beautiful and gives it an extra flare in your house
Thank you so much! Definitely a fun addition to my home 🙂
beautiful!
kw ladies in navy
enter our giveaway!
Thank you Kelsey!
Love these lightings such a great diy!
So glad you like it! Fun and easy!
This is a great idea! The copper warms up the industrial look yet is still minimal and modern!
Thanks Kat! Copper definitely is a warmer take on industrial I think.
Love this- definitely pinning!
//Birdie Shoots//
Hooray! Thanks! So glad you like it.
this is awesome and so do-able! thanks!
Of course! It was so simple and very customizable!
Wow, this is really beautiful! Can the sconce pivot from side to side?
Yes it can!! (that’s my favorite part about it 🙂 )
Oh, that’s awesome! Heading to the hardware store right now!
Second comment so I can receive replies by email. 🙂
How much did it cost (roughly)?
hmmm I haven’t added up the receipts yet but a rough estimate would be around $40.00. This depends on the cord kit, wood, and bulb that you choose. I’d say those were the biggest variables.
Great tutorial, I wanted to do something similar inspired by Prouve’s Potence Lamp and was wondering if the copper straps scratch the pipe when you turn it? Thank you!
No it turns smoothly with no scratching. Hope this helps and good luck!
These look amazing. I’m planning on making some myself for my new apartment. I was wondering, do the urban outfitters cords have on/off switches?
Thanks Hannah! Yes my cords had switches on them in addition to the plug!
i loved this so much and enjoyed the project. thanks so much for the inspiration.
Very cool. Thinking of putting a metal plate with a hole in it on the back of the sconce, and having the wire go through the wood so I can rig it to an electrical box for a wall switch. Can anyone see any potential “gotchas” here?
Hey Claire! Stunning DIY. I was planning to do something like this myself and was wondering, did you do anything to secure the elbows? I bent the copper for a coat rack project but for the light fixtures I do think elbows look better :).
Hey Claire – I just wanted to let you know that you’re the inspiration that got me into light making! Here’s a light that I made that you might like to check out! http://www.mayaathome.com/2016/06/29/diy-light-kitchen-sconce/
So I tried to do this tonight and it was an epic fail…. I tried to follow the instructions as best I could, but I couldn’t find braided cloth wire anywhere except online and there were no instructions on how to accurately secure the wire to the bulb fixture screws 🙁