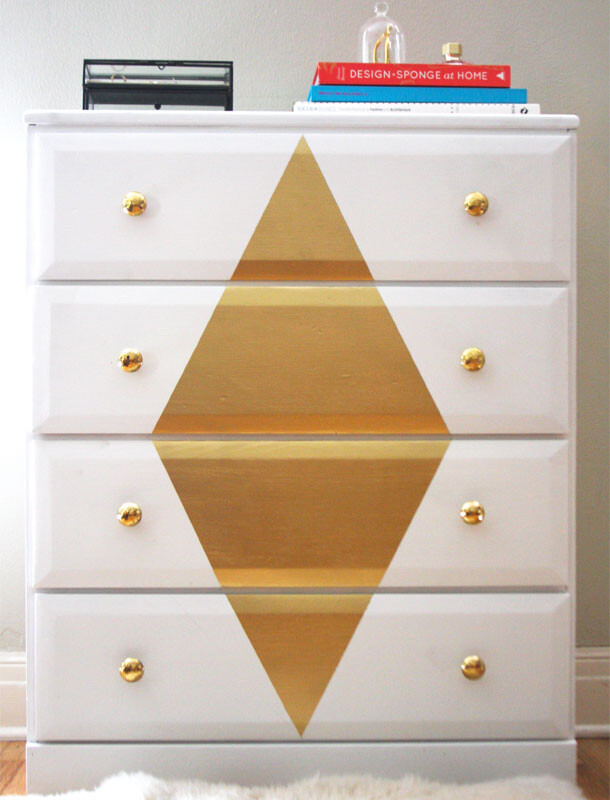

Refinishing a dresser can be super overwhelming. I’m often asked the questions: What qualities should I look for when furniture hunting? How do I ensure that I prime properly? What paints should I use? Claire here, and today’s project has been a long time coming. Over the last couple months, Chanel has had some major dresser drama — broken drawers, socks and tee shirts scattered on the floor, it hasn’t been pretty. So in an effort to upgrade her storage situation (and celebrate us being roomies for a year!), we set out to makeover this wooden dresser in a most glamorous way. Keep reading to learn how I did it and to get my tips for personalizing any sad furniture you have at home.


![]()
- dresser (search vintage shops, craigslist, your parents’ attic, etc.)
- screw driver
- hand sander (or sand paper if your dresser doesn’t have paint on it already)
- Kilz 2 Primer and Sealer
- Martha Stewart Living Pure White MSL253 in High Gloss
- Behr Pink Mimosa P180-3 in High Gloss
- Krylon metallic gold spray paint
- knobs (Hobby Lobby has a great selection)
- ruler
- blue painters tape
- pencil
- phillips screw driver
- paint brushes
![]()
- Begin with a solid wood dresser. The less paint and gloss it has on it, the better. Remove any existing hardware.
- Sand away any paint and gloss until you have as clean a slate as possible.
- Brush off sanding residue and paint two coats of primer anywhere that paint will go.
- Once primer is dry, paint the chest of the dresser and drawer fronts with 3 coats of pure white high gloss.
- Paint the sides of the drawers with 2 coats of Pink Mimosa paint for a fun pop of color. Once the drawers are dry, place them back into the dresser frame. With a pencil and a ruler, measure and mark your design on the front of the dresser. Remove the drawers, tape off the pattern with blue painters tape and spray with metallic gold spray paint.
- Once dry, remove the tape screw in new knobs. Slide the drawers back into the dresser frame.