

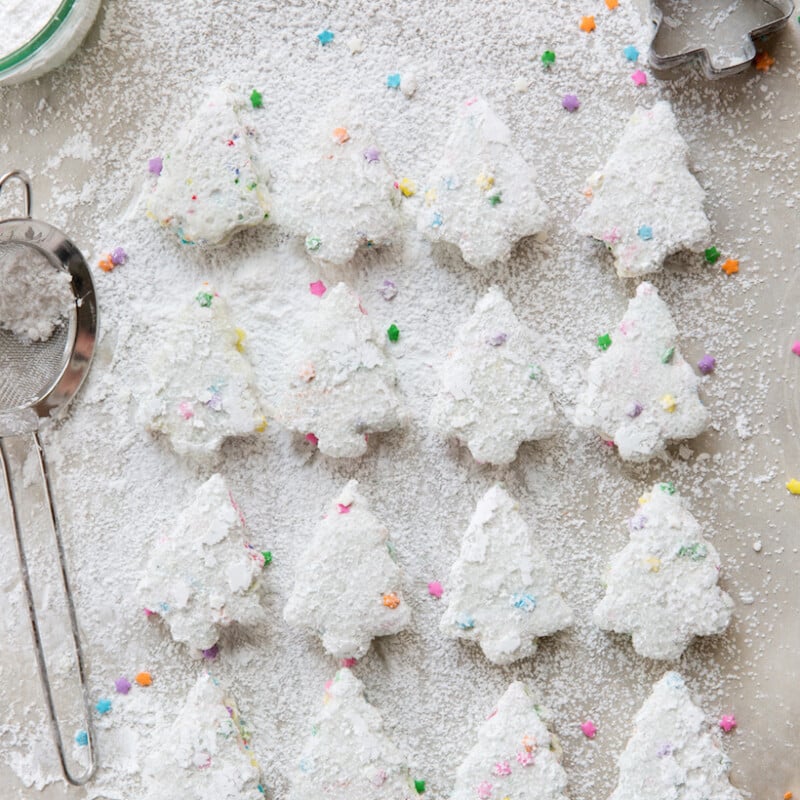
Full disclosure: I’m a total sucker for funfetti cakes. Usually, the store-bought super sugary cakes at kids’ birthday parties are really not that tempting to me, but when funfetti enters the picture? Resistance is futile. Since we all obviously need a little more fun(fetti) in our lives, I dreamed up a way to enjoy these rainbow cuties through the holiday season with (get ready for it) Christmas tree-shaped marshmallows! Well, you can actually make them any shape you want, but the trees are pretty perfect, don’t you think? Have you ever made homemade marshmallow? They’re a relatively new thing for me, but I’m really wondering why it took me so long to get on the train because they are so easy. You’re going to freak when you see how a simple combination of gelatin, sugar, and corn syrup combines to make something this fluffy and delicious. Pure magic, I tell ya.

It’s a good thing this recipe makes a lot, because you’re going to want to dunk these in steaming cups of cocoa nightly at least once a week and pack them up in cute little bags to gift to all your lucky friends.

Once you’ve mastered this basic recipe, get crazy by mixing up the flavors! Add a little cocoa powder to make these chocolate-y, swap in crushed candy canes for the funfetti sprinkles, or try orange or almond extract in place of the peppermint.

Oooh, or how about using these beauties as the centerpiece to a holiday-themed s’mores situation? So many funfetti-filled ideas in my brain right now.

Cheers to a sweet holiday season, and I’d love to hear in the comments if you give this homemade marshmallow a try! Keep reading for the recipe…


*photos by Molly Winters
Homemade Funfetti Holiday Marshmallows
Serves 16 - 20 marshmallows
Homemade Funfetti Holiday Marshmallows
Categories
Ingredients
Ingredients
- cooking spray
- powdered sugar for coating pan and marshmallows
- 2 (1/4-ounce) envelopes of powdered unflavored gelatin
- 1 cup granulated sugar
- 2/3 cup light corn syrup
- 1/8 teaspoon salt
- 1 teaspoon pure vanilla or peppermint extract
- funfetti sprinkles
Instructions
- Spray an 8x8-inch baking pan with nonstick cooking spray. Use a small sieve to dust the pan generously with confectioners' sugar, knocking out any excess.
- Put 1/3 cup water in the bowl of a stand mixer fitted with the whisk attachment. Sprinkle the gelatin into the bowl and stir briefly to make sure all the gelatin is in contact with water. Let soften while you make the sugar syrup.
- In a heavy saucepan, combine the granulated sugar, corn syrup, salt, and 1/3 cup water. Place over moderate heat and bring to a boil, stirring until the sugar is dissolved. Continue boiling without stirring for exactly 1 minute. Remove the saucepan from the heat and let stand for 10 seconds.
- With the mixer on low speed, pour the hot sugar syrup into the softened gelatin in a thin stream down the side of the bowl. Gradually increase the mixer speed to high and beat 5 minutes, until the marshmallow forms a thick ribbon when the whisk is lifted. With the mixer on low, beat in the vanilla or peppermint extract, and sprinkles.
- Scrape the marshmallow into the prepared pan (it will be very sticky) and use wet fingertips to spread it evenly and smooth the top. Let stand, uncovered at room temperature, until the surface is no longer sticky and you can gently pull the marshmallow away from the sides of the pan with your fingertips, at least 4 hours or overnight.
- Dust a cutting board with confectioners' sugar. Use a rubber spatula to pull the sides of the marshmallow from the edge of the pan (use the spatula to loosen the marshmallow from the bottom of the pan if necessary) and invert onto the cutting board. Dust the top with confectioners' sugar. Spray a cookie cutter with nonstick spray and dust with confectioner’s sugar to prevent sticking, then cut out marshmallows into desired shapes.
*Marshmallows can be stored, layered between sheets of wax paper or parchment in an airtight container in a dry place at cool room temperature, for 1 month.


How lovely x
Jessica — NinetyCo
They look amazing and they must taste so nice!
these look fab and so festive! 🙂
theButter.co.uk
I have yet to try making homemade marshmallows, but I’ve always wanted to! These look so cute, I think I might finally do it. Especially perfect to drop into hot chocolate this time of year. 🙂
http://www.wonderlandsam.com
Omg these are great! I will definitely be making them soon! Thanks for the recipe!
xx,
Daeyz
http://www.daeyz.com
These look adorable and sound tasty. I want to caution you about the amount of peppermint being the same as the vanilla. I made some peppermint marshmallows last night and the recipe called for 1/4 tsp. of peppermint. We used extract and it was too much. We wanted them to taste good in hot cocoa and to eat alone. I am trying this recipe next. Thank you?
Agreed! I did the same thing and learned the hard way. Now I use a medicine dropper or the syringes the pharmacy gives me for liquid medicine for my kids. 1 drop at a time until you can just barely smell it otherwise it is too overpowering. Hope this helps!
Made these with my 10 year old! They are delicious!!! Thank you so much for sharing- I honestly had no idea making my own marshmallows would be so simple and not as impossible as I first thought.