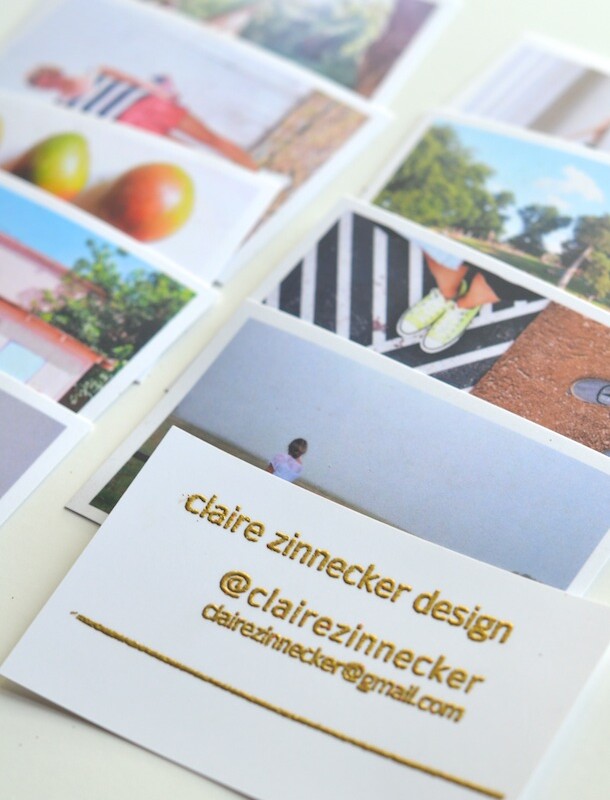
Claire here, and I’ve got some exciting (and slightly scary) news to share: I’ve finally decided to take the plunge and launch my own part-time interior design business, Claire Zinnecker Design! I feel incredibly fortunate to be surrounded by so many creative, talented and supportive people who have helped me reach this point and shown me the endless possibilities in the world of design, and I know I’ll be reaching out to them more than ever as I embark on this new adventure. Establishing my own business means facing a whirlwind of to-do’s (DBA, EIN, EID, website, resume, portfolio…), so I thought I’d start tackling my list by making DIY business cards (baby steps!). This design is personal and handmade, yet professional and glamorous at the same time. Keep reading to see how I made them, and don’t miss the step-by-step instructions at the end of the post…
- photos printed from your Instagram photos (I used Print Studio, but Printstagram is great too)
- personalized wooden stamp (I had mine made at Capitol Rubber Stamp — helpful, fast and inexpensive)
- gold pigment ink pad
- ZING! gold embossing powder
- Heat Embossing Gun
- paint brush
- Have your favorite Instagram photos printed at 3 3/8″ x 2 1/8″.
- Design and order your personalized stamp, keeping in mind the size of the photo prints.
- Press the stamp into the pigment ink pad and firmly stamp onto the back of the card. Note: I found that the colored pigment ink actually worked better than the “embossing” pigment ink pad.
- Sprinkle the gold embossing powder onto the stamped card, making sure you cover the entire inked area.
- Turn over to shake away the excess powder.
- Use a paint brush to dust off any stray specks of glitter. Be careful not to touch the letters at any point!
- Hold the heat gun a few inches over the card to turn the powder into beautifully embossed type. Make sure not to hold the gun too close or in any one spot for too long.
- Embossing dries within 5-10 seconds. Repeat for each card.
Share this Post
Leave a Comment
Comments (54)
Author
Congrats and good news! The world needs more creative and handy designers like you. Excited to see all the beautiful spaces you will create.
Thanks so much! It’s a big step but I’m excited to see where it will take me! xo
beautiful project! love it love it.
thank you!
They turned out beautifully, Claire! And I’m excited for your new biz!! You’re going to be amazing!
Thanks so much Kate!
Great idea!!!
Thank you Desiree, they were so fun to make!
Great job, Claire! Way to persevere until you found a solution.
Definitely took some trial and error but so glad the result turned out well!
What a great DIY!
http://liveitinerantly.com
Thank you Quyen!
Congrats Claire!! I’m so excited for you, I know you’ll do wonderful things!
Thanks so much Kathryn! It’s scary but very exciting!
These are great. Congratulations on the new venture!
Thank you Carrie! I really appreciate the warm responses from everyone.
Love these! Great idea Claire!
Thank you Jacqueline! They were so simple and easy (the best part!) 🙂
Claire,
We have all the confidence in the world that you have the talent to succeed. Good luck! Love, Eldon and Dona
Thank you Eldon, that means so much! Thanks to you and Dona for inspiring me at a young age with all your artistic talents. Love you both!
Clever idea! And very exciting news to have you going out on your own!
thank you so much Babette! xo
Beautiful and a great reflection of your brilliance. Lovely and classy and chic!
You will be sought after!
Such sweet words, Sara, thanks for the boost of confidence!
These are too cool! Congrats on the new business!
Thank you so SO much!! 🙂
The cards are great Claire. You are so talented. Good luck on your new adventure.
Love,
Grandma
Thanks Grandma!! Love you and miss you!
This is such great news. I’m very proud of you. The cards also look great.
Thank you so much Uncle Chris, love you!
Claire, What a brave and talented woman you are. I am so happy for you. How exciting. I am sure you will do great. You are very gifted.
Thank you so much Claudia for your kind words! 🙂
Your cards are like a little present. Congratulations!
Thanks, Gail! I’m glad you like them!
Claire! Congrats! What a wonderful gift you have been blessed with …and now sharing with the world. Love!
Thank you Sharen, I’m so grateful for the warm responses from everyone!
Love all of this Claire! Such talent!
Yay! Thank you Natalie that means a lot!
You, my dear, are a rock star! Everything you create has a bit or a lot of you in it…. Unique, beautiful and interesting. I can’t wait to see how it all unfolds. Very, very proud of you!
xoxo, lisa
Thank you Lisa! I’m so glad people are responding so warmly!
Claire, You are so talented! Even your new business cards are demonstrations of your creativity! Best wishes on your new adventure!! – Patti
Patti, thank you so much! I’m so blessed to be surrounded by so many supportive friends and family.
Love it! You can find all of the supplies you need through my SOHO business as well… save on running around town or on shopping from multiple suppliers. Personalized stamps, heat tool, emboss ink, emboss powder… yes’m! http://www.StampinglyYours.stampinup.net
Thanks Shauna!
Claire – So proud of you! Congratulations on your new business venture. Very brave, but
no doubt, you will “wow” all of us. You know I am a huge fan of yours. Love the embossed
photo cards. I, totally agree with the first person that commented, “the world needs more
creative and handy designers like you” !!
Genevieve
Thank you for your sweet words Genevieve! It means so much to be surrounded by such supportive people.
I quite impressed to see your business card design. That’s sound amazing !.
Twitter: @lyutharjacob
Thanks…
You are so kind! Thanks so much!
My sister and I are starting a business and just loved this idea so we decided to use your diy as inspiration for our business cards. Did you have any trouble with the ink running since the cards are coated a bit? Thanks! Congrats on your business!
Glad you like them, Rachel!! I actually did have trouble with ink smearing when I used the clear pigment ink…when I used the gold pigment ink pad it worked perfectly! Good luck and let me know if you have any other questions!
Thanks so much for the info!