
If you do home improvement projects often, you probably know that they almost always take more time (and work, and money) than you originally planned. Well friends, I stand before you today reinvigorated and re-inspired, as I can honestly say that this makeover project might be the first of its kind to have actually been easier and faster than I ever imagined. Crazy, right?
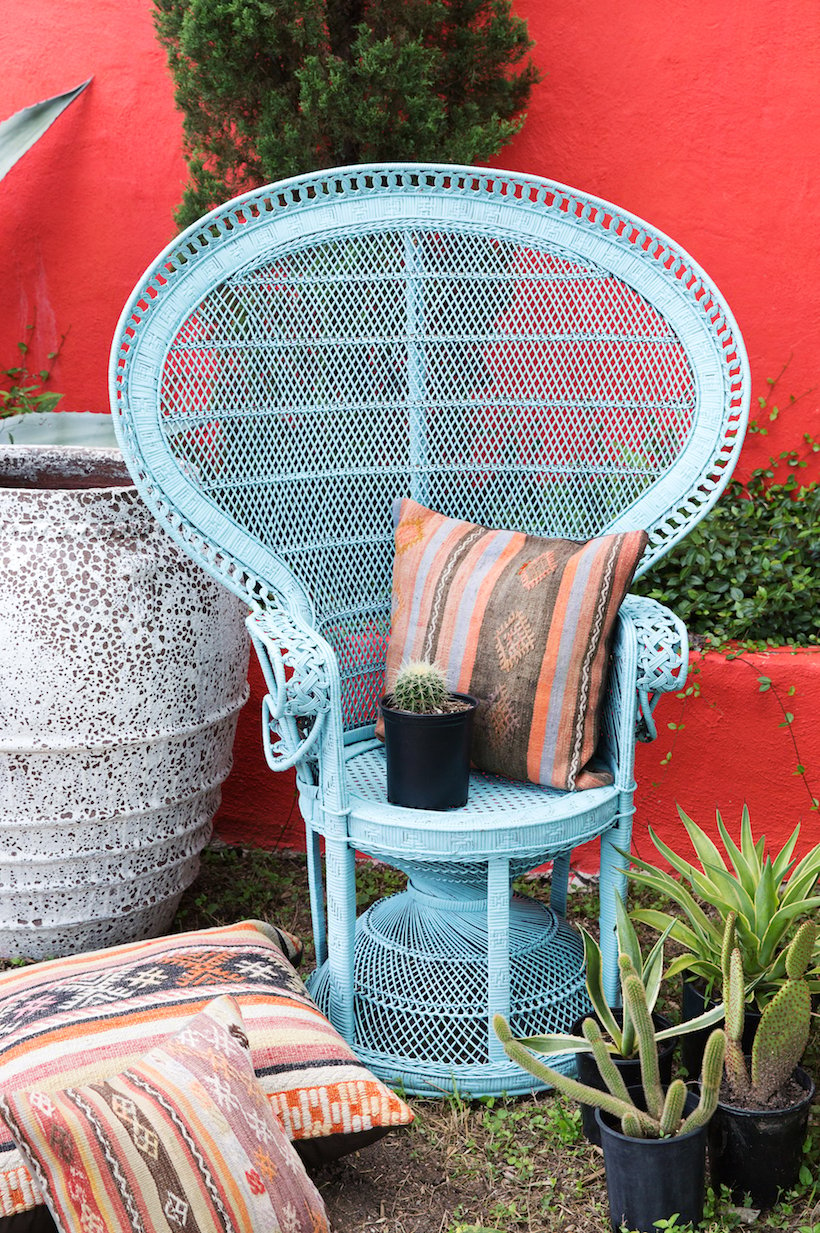
It started with our team’s shared love of rattan peacock chairs and a yearning for one in a fun, cheery color. I expected the project to take days — what with that intricate wicker work and needing to fill in each tiny crevice — but I was so wrong. From start to finish, the entire task took up the better half of one afternoon, and while I’d like to think that’s a result of my ever-improving craftsmanship, the real hero was the BEHR paint. I’ll talk a bit more about that below, but for now, let us behold the beauty that is the peacock chair: organic, shapely and light weight, there’s no easier way to make a bold statement in your decor, and surprisingly enough, they can be found at resale shops from time-to-time for around $100. Of course, even if you don’t have a peacock chair, this same technique can be applied to just about any style wicker furniture. Keep reading for the surprisingly simple step-by-step…

Our friend Candice from OH! Fox Creative (who has all sorts of fabulous rattan pieces in her shop) provided the peacock chair. It had the right shape and was in great condition, but had unfortunately fallen victim to two incomplete spray paint jobs… hence the splotchy gold-on-black look. So often we resort to using spray paint by default, but on a project like this — since the spray would simply blow through the holes in the wicker — painting with a brush was the way to go.

After comparing the different lines at Home Depot, Marquee from BEHR was the clear choice. Because of the wonky previous paint jobs on the chair, I knew we’d need a paint with a great primer. And with exceptional resistance to dirt and fading, you really can’t beat the quality of this line.
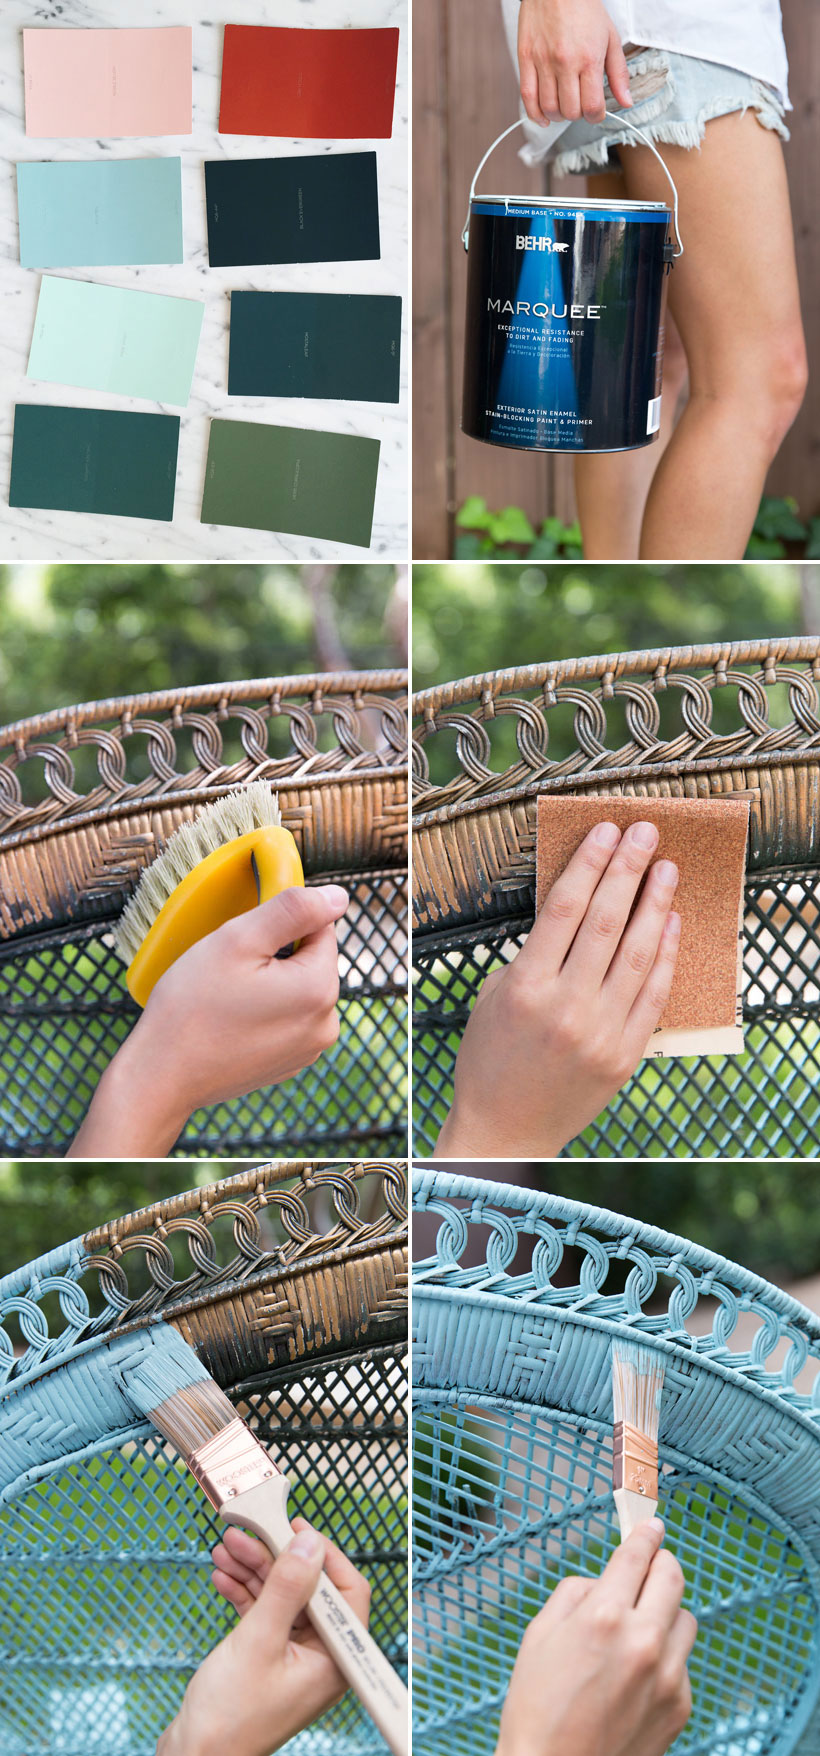
![]()
This post is brought to you by BEHR. Color that’s True to Hue. If you feel it you can find it. Visit truetohue.behr.com


I love this DIY! Thanks for sharing!
Go, C! This rocks–just like you!
I can’t believe how you transformed this chair – it’s a real beauty now!
Do you think the paint will flake or chip off after the chair is in use? I am about to repaint 2 rattan chairs, a settee and ottoman. What are your thoughts on gloss spray paint vs regular paint. I love your chair!
Behr Marquee paint is a good quality paint. I didn’t use it for wicher, but it’s great for walls. Interesting to find out using two different paint brush sizes worked well instead of buying spray paint. The chair is beautiful!
I read this post because I have to re do a whole antique wicker set, which had about 4 coats of paint, and started to flake off all of a sudden. The last time we had used spray paint, but I remember the second coat had been given with a brush. It has so much scroll and little nooks that the older paint is really stuck, I been peeling it off with a dental instrument, but it is such a job! I also have to repair some of the borders and of the wicker covering the wood legs. Do you have any suggestions as how to do it? I want to paint them in white, like the three last coats. Thak you for your attention.
I love this chair
I have an old one but first I must arrenge It, It has a Big hola on the Seat. Diré I will do It And Paint It. Thankyou.
I like this idea. The paint will change something that has become obsolete into something new.
I can t see the finished product
Thank you so much for this! We have 4 wicker chairs we bought and bought soooo much spray paint. We were about to get rid of them b/c it was taking too long to spray, I mean weeks. They almost ended up as another wicker chair, spray paint fail until I saw this post! I’m going to try it!