

There have been Thanksgivings where I’ve admittedly taken on too much. It’s the biggest food day of the year, and I’m always the designated chef. I know I’m not alone in approaching the holiday with high hopes and a healthy dose of ambition. With time comes experience, though, and I’ve become an expert at checking as many tasks off my Thanksgiving menu planning list ahead of time. My secret is delegation, and the one thing I always hand off is these no-bake pumpkin pie bars.
Of course, we always serve a classic pumpkin pie alongside apple, pecan, and sometimes even a chocolate pie. But when a stray family member needs a task, these bars are perfect. (To my younger brother, Jay, who has no baking skills whatsoever: I’m looking at you.)
And I’m actually not the biggest pumpkin pie fan. Controversial, I know, but it means I’m more than happy to put someone else in charge of bringing pumpkin to the party. If that someone is you, these bars couldn’t be easier. They can be made the night before, and because they’re no-bake, you don’t have to ration oven space or play a game of jigsaw to make everything fit. With that exciting news, let’s get baking mixing.


How These No-Bake Pumpkin Pie Bars Hold Their Shape
If you’ve made my lemon cardamom bars, you know the magic of a no-bake dessert. Build in ingredients that add structure, give everything time to set, and you get a luscious pie-like filling without the oven. Here, cream cheese and whipped cream are folded together and set in the fridge to create a sliceable dessert. For clean lines when cutting, I like to freeze the bars for about an hour after they’ve set in the fridge overnight.
If you’re like me and don’t love pumpkin pie, these have all the spiced pumpkin flavor without the sometimes gelatinous texture. The filling is light, silky, and almost mousse-like, with a crunchy brown butter graham cracker crust. You get every traditional flavor in an even tastier form.


How to Make Pumpkin Butter
The one thing you do have to make ahead is the pumpkin butter. Pumpkin purée, like other vegetables and fruits, contains a lot of water, and we need to cook off the extra liquid so the bars don’t fall apart. The key is doing it without adding a pudding mix or gelatin. You can absolutely use a store-bought pumpkin butter, but it’s also easy to make ahead and keep in the fridge, and you can customize the spices to your liking. For me, that means an obscene amount of cinnamon and ginger.
All you need is a can of pumpkin, spices, a bit of sugar, and a splash of apple cider vinegar. Combine everything in a saucepan over low heat, stirring often so it doesn’t stick to the bottom. When it’s done, you’ll have a lusciously thick spread that’s just as good on toast, waffles, and yogurt as it is in these bars. Let it cool completely before folding it into the filling.


Tips for Making Flavor-Packed Pumpkin Pie Bars
Anytime I make a recipe with multiple layers, I give each component as much standalone flavor as possible. Combined, the result is even better. Here’s what to keep in mind:
- The crust: Brown butter adds a nutty, caramel flavor, and salt is a must. There’s nothing better than a salted brown butter cookie, and the same goes for this crust. If you’d rather skip the butter, coconut oil works, though you’ll lose the brown butter flavor.
- The filling: Use fresh spices. The pumpkin butter concentrates the flavors, and freshly ground cinnamon, cloves, and nutmeg add warmth and depth. A pinch of salt helps everything sing.
- The topping: For the whipped cream, add a dusting of powdered sugar, a splash of vanilla or vanilla bean paste, another pinch of salt, and a little pumpkin pie spice.
Believe me, you’ll be making this recipe all season long.

Looking for more holiday inspiration? Explore our favorite Thanksgiving desserts for more ideas to bring to the table.
Print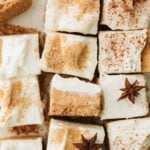
No-Bake Pumpkin Pie Bars
- Total Time: Overnight + 55 min
- Yield: 16 bars 1x
Description
An easy no-bake dessert for your Thanksgiving dessert table.
Ingredients
For the pumpkin butter:
- 1 15–ounce can of pumpkin puree
- 1/4 cup brown sugar
- 1 teaspoon pumpkin pie spice
- 1 tablespoon apple cider vinegar
- 1/4 teaspoon salt
- for the crust:
- 1 stick of butter
- 1/2 teaspoon salt
- 1/2 teaspoon pumpkin pie spice
- 2 cups of graham cracker crumbs
For the filling:
- 4 ounces cream cheese, softened to room temperature
- 2 tablespoons powdered sugar
- 1/4 teaspoon pumpkin pie spice
- pinch of salt
- 1 teaspoon vanilla
- 3/4 cup pumpkin butter (made above or store-bought)
- 4 ounces heavy whipping cream
Instructions
- Make the pumpkin butter. In a stove top pot, add all of the ingredients and stir to combine. Turn heat to low and bring pumpkin to a simmer. Stir every few minutes, scraping the bottom to avoid sticking, and cook for about 25 minutes, until pumpkin has reduced by half and becomes thick. Keep an eye on the heat, adjusting as needed to avoid burning. Remove from the heat and set aside to cool. Store pumpkin butter in an airtight container in the fridge until ready to use.
- Make the crust. In a stove top pot, add the stick of butter and turn heat to medium. Melt the butter and stir occasionally until the butter browns, keeping a close eye on it and removing from the heat as soon as the butter has browned. Let cool completely.
- Add the graham cracker crumbs, salt, and spice to a mixing bowl, and pour over the browned butter. Stir to combine until crust feels like sand. Line an 8×8 pan with parchment and pour crumbs into pan. Using the back of a glass, press the crust down into a uniform layer. Store in the fridge until ready to fill.
- Prepare the filling. Add the cream cheese, sugar, spice, salt, and vanilla to the bowl of a stand mixer and with the paddle attachment, whip until smooth, scraping down the sides halfway through. Add the cream cheese to a separate large bowl.
- Add the heavy whipping cream to the stand mixer bowl and switch to a whisk attachment. Whip until whipped cream reaches stiff peaks. Set aside.
- Add the pumpkin butter to the cream cheese and fold together until smooth. Add the whipped cream to the bowl in two parts, folding to combine carefully without deflating the whipped cream.
- Pour the filling into the crust and flatten into an even layer. Store in fridge overnight to set.
- When ready to serve, I like to keep in the freezer for an hour prior to serving to ensure easy slicing. Slice and top with whipped cream as desired. Enjoy!
Notes
Timing Note: Prep time and cook time are estimates and do not include the overnight refrigeration required for the bars to set or the additional hour of freezing recommended before slicing. Plan to make these bars at least one day ahead of serving.
Make ahead: Prepare the bars the day before serving and refrigerate overnight to allow the filling to set.
For clean slices: After refrigerating overnight, place the bars in the freezer for about one hour before cutting into squares.
Storage: Keep the bars covered in the refrigerator until ready to serve.
Transport: If bringing these bars to a gathering, transport them chilled in a covered container or cooler with ice packs.
- Prep Time: 20 min
- Cook Time: 35 min
- Category: Dessert
- Method: No Bake